Melodity
Search…
Node operators
Whitepaper storyboard
Powered By GitBook
Validators
How to run a validator node
Server requirements
In order to successfully run a validator node, the server should have at least:
- CPU: 6+ vCore
- Ram: 16+ Gb
- Storage: 160+ Gb (possibly SSD)
- Bandwith: 1+ Gbps (unmetered)
- A domain, you can buy some on NameCheap
- An SSL certificate, you can generate one following this tutorial
We suggest you run a VPS on OVH as the price is pretty low.
Who are validators?
Validators exist because of the consensus methodology (nPoS - nominated Proof of Stake) used by the Beats Chain. A validator is a node operator but in advance contributes to block production and validation.
Validators receive prizes for the service they give to the network but they will lose funds in case of unfair or malicious behaviour
Setting up a validator node
There are two methods of setting up a validator node:
- getting the official sources and compiling them using Rust compiler
- getting the official executables and simply run them on your machine
Executables are built only for Linux machines, for any other OS you need to compile the sources from scratch using
cargo.All released versions of the Melodity Beats Nodes can be found on the official GitHub repository.
In order to run a node download the
melodity-beats-node executable in your machine using your preferred method, in the next example, we will use wget.1
wget https://github.com/Do-inc/melodity-beats-chain/releases/download/v2.1.1/melodity-beats-node
Copied!
Make sure to always download the latest version (v 2.1.1 at the time of writing).
You will need to make the file executable using:
chmod +x melodity-beats-nodeAnother file needed is the configuration file named
chain-conf.raw.json it will be included in all the releases as it holds the runtime code. You may download it with wget as follows.1
wget https://github.com/Do-inc/melodity-beats-chain/releases/download/v2.1.1/chain-conf.raw.json
Copied!
Make sure to always download the latest version (v 2.1.1 at the time of writing).
Once the files are downloaded running a node is as simple as running the next command
1
./melodity-beats-node \
2
--chain chain-conf.raw.json \
3
--base-path /home/<username>/beats-chain/<your node name> \
4
--bootnodes /ip4/<boot-node ip>/tcp/30333/p2p/<boot-node identifier> \
5
--validator \
6
--name <your node name> \
7
--rpc-cors all
Copied!
This command will:
- Start the
melodity-beats-nodefrom your current directory - Load the configuration stored in
chain-conf.raw.json - Set the storage path where all blocks and data will be stored to
/home/<username>/beats-chain/<your node name> - Load the current chain state from the node
/ip4/<boot-node ip>/tcp/30333/p2p/<boot-node identifier> - Start the node as a validator
- Set the node name to
<your node name> - Permit all incoming RPC and Websocket connections to your node
This method of running a validator node starts it in live streaming, this is useful for testing but not for running and maintaining a node, in order to run and maintain a node we suggest you use a tool like
supervisor that will keep your node up and running, and an example configuration for supervisor is given below1
[program:beats_chain_node]
2
autorestart=true
3
autostart=true
4
5
command=/home/<username>/beats-chain/melodity-beats-node --chain chain-conf.raw.json --base-path /home/<username>/beats-chain/<your node name> --bootnodes /ip4/<boot-node ip>/tcp/30333/p2p/<boot-node identifier> --validator --name <your node name> --rpc-cors all
6
directory=/home/<username>/beats-chain/
7
8
user=<username>
9
10
stdout_logfile=/home/<username>/beats-chain/beats_chain_node.log
11
stdout_logfile_maxbytes=10MB
12
stdout_logfile_backups=1
13
stderr_logfile=/home/<username>/beats-chain/beats_chain_node.error.log
14
stderr_logfile_maxbytes=10MB
15
stderr_logfile_backups=1
Copied!
Explaining a bit the supervisor configuration provided above:
- L 1: Supervisor identifies the beats chain node as
beats_chain_nodeso every time you need to interact, restart etc. with your node you may refer to it using this name - L 2-3: The node will automatically restart (by default at most 3 times in 60 seconds) if it dies for any reason, also once
supervisorstarts the node will automatically start - L 5-6: In the example configuration we have placed all the node files under the
/home/<username>/beats-chainso wechdirto that folder before starting the node and then run the command to start the node - L 8: Supervisor usually boots up as root with its default configuration, in order to follow the least privilege pattern we change from root to a different user
- L 10-15: As
supervisorstarts the node as a daemon service we need to log the standard output and the errors if any, the two files are/home/<username>/beats-chain/beats_chain_node.logfor the standard output and/home/<username>/beats-chain/beats_chain_node.error.logfor the errors, both the files will be at most 10MB large and have a backup so that at most 40MB of storage is taken by the node execution logs.
Substrate based chains output the default standard output to
stderr so you'll find the standards log mixed up with errors in your <file>.error.logAll
<text> tags must be substituted in order for the program and the configuration to work, they are simply placeholdersOnce
supervisor is set up the next step in order to complete the whole tutorial is setting up a web server in order for you to connect to your node using Websockets and RPC.To start you need to install and configure
nginx.1
apt install -y nginx
2
cat > /etc/nginx/sites-available/beats_chain_rpc <<EOF
3
server {
4
server_name <domain>;
5
6
root /var/www/html;
7
index index.html;
8
9
location / {
10
try_files $uri $uri/ =404;
11
12
proxy_buffering off;
13
proxy_pass http://localhost:9944;
14
proxy_set_header X-Real-IP \$remote_addr;
15
proxy_set_header Host \$host;
16
proxy_set_header X-Forwarded-For \$proxy_add_x_forwarded_for;
17
18
proxy_http_version 1.1;
19
proxy_set_header Upgrade \$http_upgrade;
20
proxy_set_header Connection "upgrade";
21
}
22
23
# listen [::]:443 ssl ipv6only=on;
24
listen 443 ssl;
25
ssl_certificate <your domain ssl certificate>;
26
ssl_certificate_key <your domain ssl private key>;
27
28
ssl_session_cache shared:cache_nginx_SSL:1m;
29
ssl_session_timeout 1440m;
30
31
ssl_protocols TLSv1 TLSv1.1 TLSv1.2 TLSv1.3;
32
ssl_prefer_server_ciphers on;
33
34
ssl_ciphers "ECDHE-ECDSA-CHACHA20-POLY1305:ECDHE-RSA-CHACHA20-POLY1305:ECDHE-ECDSA-AES128-GCM-SHA256:ECDHE-RSA-AES128-GCM-SHA256:ECDHE-ECDSA-AES256-GCM-SHA384:ECDHE-RSA-AES256-GCM-SHA384:DHE-RSA-AES128-GCM-SHA256:DHE-RSA-AES256-GCM-SHA384:ECDHE-ECDSA-AES128-SHA256:ECDHE-RSA-AES128-SHA256:ECDHE-ECDSA-AES128-SHA:ECDHE-RSA-AES256-SHA384:ECDHE-RSA-AES128-SHA:ECDHE-ECDSA-AES256-SHA384:ECDHE-ECDSA-AES256-SHA:ECDHE-RSA-AES256-SHA:DHE-RSA-AES128-SHA256:DHE-RSA-AES128-SHA:DHE-RSA-AES256-SHA256:DHE-RSA-AES256-SHA:ECDHE-ECDSA-DES-CBC3-SHA:ECDHE-RSA-DES-CBC3-SHA:EDH-RSA-DES-CBC3-SHA:AES128-GCM-SHA256:AES256-GCM-SHA384:AES128-SHA256:AES256-SHA256:AES128-SHA:AES256-SHA:DES-CBC3-SHA:!DSS";
35
}
36
EOF
37
ln -s /etc/nginx/sites-available/beats_chain_rpc /etc/nginx/sites-enabled/
38
rm /etc/nginx/sites-enabled/default
Copied!
The previous configuration needs you to have:
- A domain name you own
- An SSL certificate for your domain
Once the Nginx server endpoint is set up its time to set up Nginx to work as a daemon with
supervisor.1
cat > /etc/supervisor/conf.d/nginx.conf <<EOF
2
[program:nginx]
3
command=/usr/sbin/nginx -g "daemon off;"
4
autostart=true
5
autorestart=true
6
startretries=5
7
numprocs=1
8
stderr_logfile=/var/log/supervisor/%(program_name)s.log
9
stderr_logfile_maxbytes=10MB
10
stdout_logfile=/var/log/supervisor/%(program_name)s.error.log
11
stdout_logfile_maxbytes=10MB
12
EOF
13
systemctl disable nginx
14
service nginx stop
15
supervisorctl reread
16
supervisorctl update
17
supervisorctl status
Copied!
The previous commands load the Nginx configuration to the standard Supervisor configuration and reload the supervisor configuration actually starting Nginx as a supervised daemon.
Candidating as a validator
Even if the node is completely set up you're not yet candidating as a validator and your node is simply acting as a backup one.
To candidate, your node as a validator first download
subkey, a tool for generating substrate-based accounts. You can find the official version of subkey in our GitHub repository or use the following command to directly download it.1
wget https://github.com/Do-inc/melodity-beats-chain/releases/download/v1.0.0/subkey
Copied!
In order to candidate as a validator, you need two wallet accounts, namely the controller and the stash they differ in how they work as the stash owns the funds but cannot actually use them, only the controller has the permission to move and use the funds on the stash wallet.
In order to generate the controller keys run:
1
./subkey generate -n beats -w 24
Copied!
This will generate a 24 words seed phrase for your wallet and return you will all the data you need, an example output is the following
Do not use any of the following keys are their seed is publicly accessible and well known
1
Secret phrase `label escape polar lucky boil grid knee robot width country unit tourist easily beef rain shrimp identify tobacco tell width away curtain electric steel` is account:
2
Secret seed: 0x98a87454c15175139be9c69deb509795f9f3f0ce95db0d59697ace33ddb88526
3
Public key (hex): 0x96f358e35dcecad0bd74d372af0145f6803986b5fa64ec6b18d84291a4e46474
4
Account ID: 0x96f358e35dcecad0bd74d372af0145f6803986b5fa64ec6b18d84291a4e46474
5
SS58 Address: 6kHXCvS5UKcUYbH35TdkqX137bAXcZPKCB9v8BqhzLd8nct9
Copied!
Store in a safe place the 24 words phrase and annotate your ss58 address as you will need it.
Now your controller address is
6kHXCvS5UKcUYbH35TdkqX137bAXcZPKCB9v8BqhzLd8nct9 generating the stash account is a bit different, you may run:1
./subkey inspect -n beats "<your 24 words seed>//stash"
Copied!
This will generate a completely new account and return you with an output similar to the following example
1
Secret Key URI `label escape polar lucky boil grid knee robot width country unit tourist easily beef rain shrimp identify tobacco tell width away curtain electric steel//stash` is account:
2
Secret seed: 0xe9c45551c350711758f2c669f3c4acb1db4aeae03908f3cb93770fadbab6da3a
3
Public key (hex): 0x324ccb296cbd7f1df17b3938c0caf783db9dfcf95004c2372e0c46cf486f5723
4
Account ID: 0x324ccb296cbd7f1df17b3938c0caf783db9dfcf95004c2372e0c46cf486f5723
5
SS58 Address: 6i1YwYCaARv6Z6fSZdWFoJWhfMeWLMTSqsNCtwxWmpjhP36p
Copied!
Now your stash address is
6i1YwYCaARv6Z6fSZdWFoJWhfMeWLMTSqsNCtwxWmpjhP36p , store it somewere as we need it a moment.Polkadot.js extension
In order to ease the procedure of setting up a validator node now that your node is up and running on a server, we start interacting with it using RPC but first, we need to set up the extension to work with the Polkadot environment.
The extension you're going to install is the officially, community-supported extension, you can download and install it in your browser from https://polkadot.js.org/extension/
Once the installation of the extension is completed activate it by clicking it and you'll be presented with a window similar to the following pic.
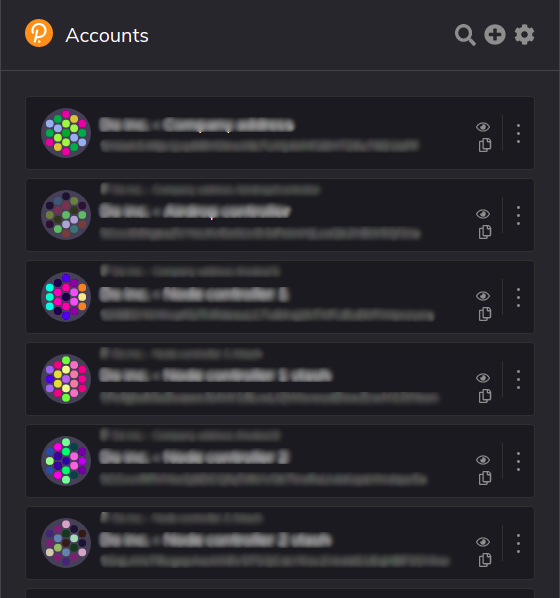
Polkadot.js example popup
If you have previously used it you may have one or more accounts otherwise the popup will be empty. In order to add a new account click the plus button on the top right of the popup and you'll be presented with a screen similar to the one below.
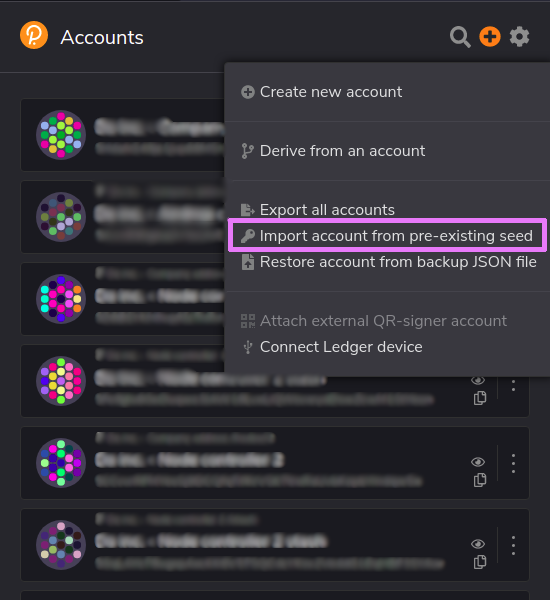
Importing account in Polkadot.js
Select "Import account from pre-existing seed" so that you can enter the previously generated seed using subkey and you'll be presented with the following screen.

Controller account import
Proceed to insert the raw seed, leave the other options to their default values and click next, you'll be asked to enter a name for your account and a password to secure it, name it something like "<whatever you want> - Controller" so that you can easily recognize it from the stash account.
Once completed the import of the controller repeat the procedure in order to add the stash account, but once you're presented with the import screen open the advanced section and enter the value as in the following pic.
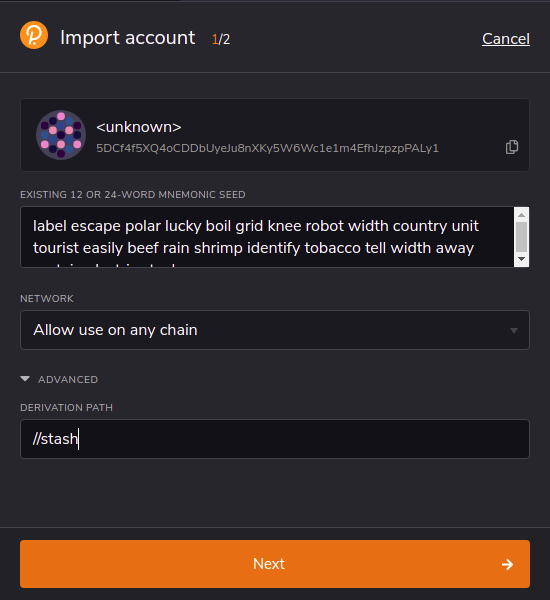
Stash account import
Proceed to insert the raw seed then click next, you'll be asked to enter a name for your account and a password to secure it, name it something like "<whatever you want> - Stash" so that you can easily recognize it from the controller account.
Now that the extension is set up we can proceed with the real candidacy.
Candidating your node to be a validator
All the operations from now on will be executed on the official Polkadot hosted app, https://polkadot.js.org/apps/#/explorer
Connect to one of the official nodes using the "live networks" section or insert in the "custom node" field under the "development" section one of the official provider links.
Navigate to the account section, and allow the polkadot.js extension to inject the accounts. Then check that your stash wallet owns enough funds to start the stacking process, remember that the controller needs funds too in order to run actions on the stash account.
Once you're sure to own enough funds in the controller to stake and control the stash wallet open a new page of the explorer but instead of connecting to one of the officials granted nodes open the "custom" section and insert
wss://<your server ip> then press switch on the top of the page.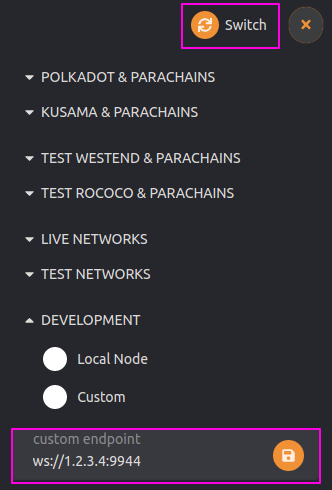
Connection to your running node
Once connected to your node open the developer section and select
RPC calls like in the following picture.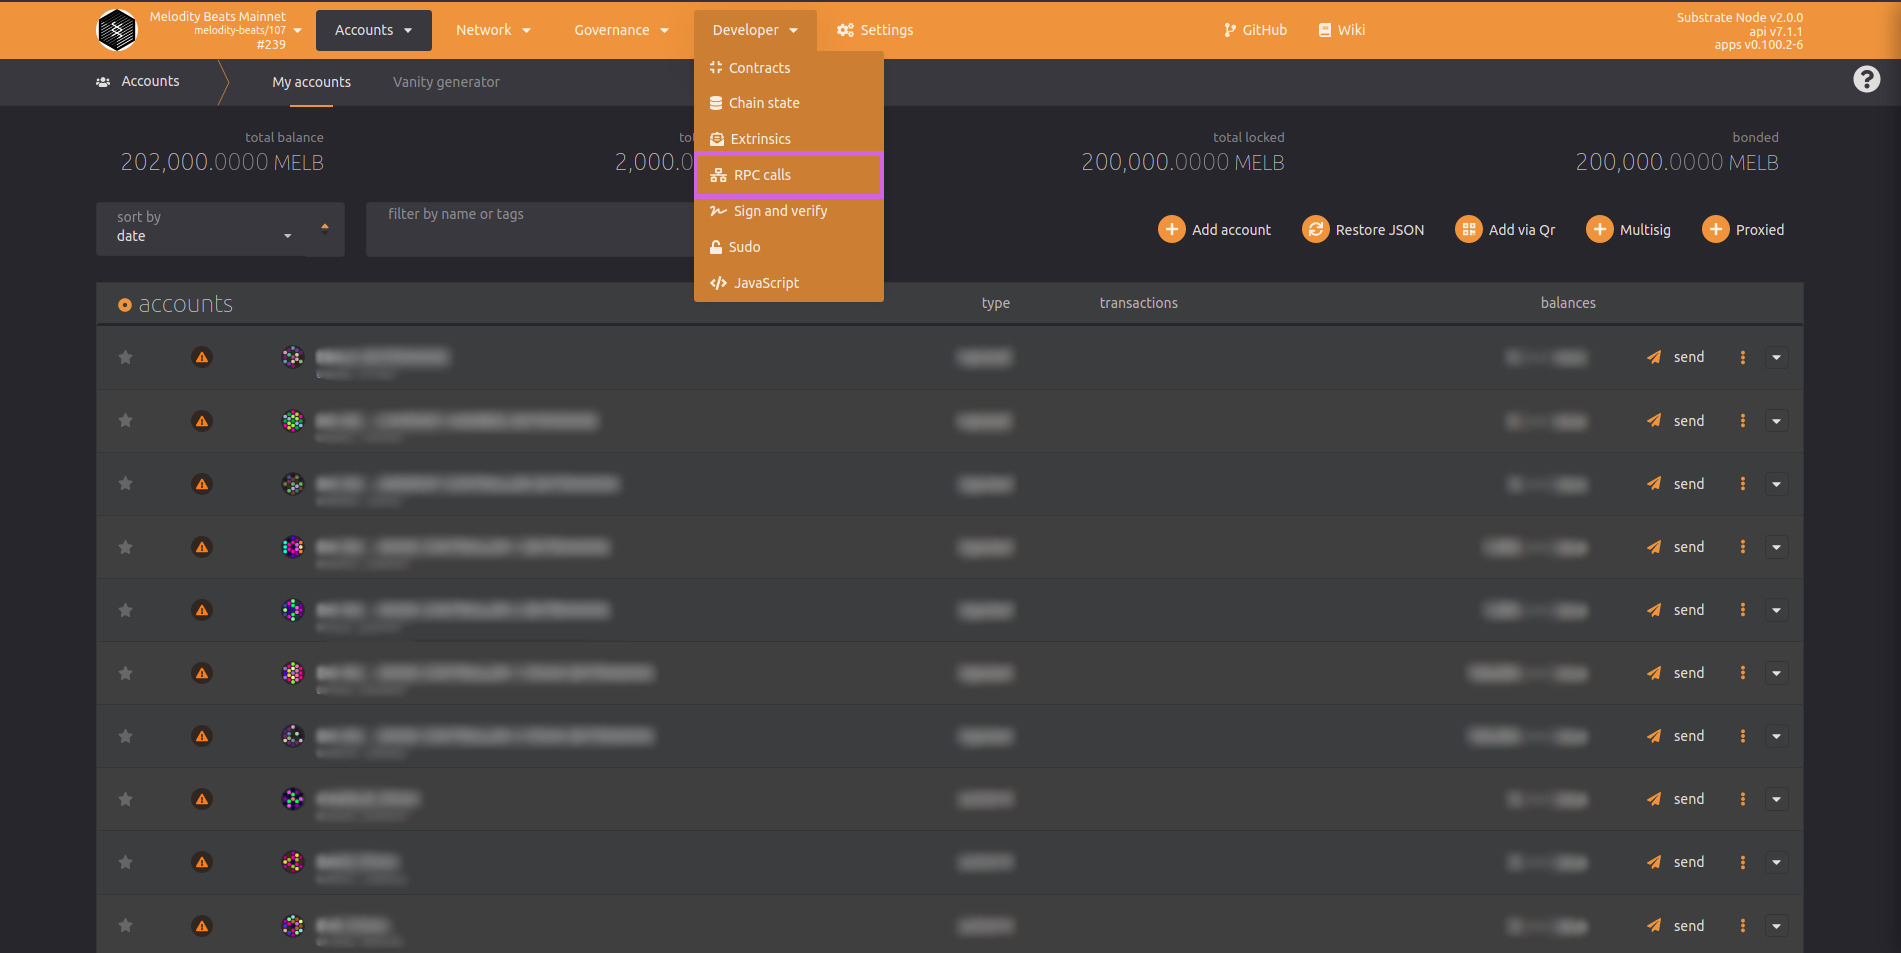
Opening the RPC calls section
Once opened the
RPC calls section select the author endpoint and the rotateKeys function as in the following picture.
Rotate author keys
Then click on the "Submit RPC call" button a full code will be returned on the page, copy it and annotate it.
Connect back to one of the official nodes and navigate to the
stacking section under Network. Then navigate to the Account actions table like in the following pic.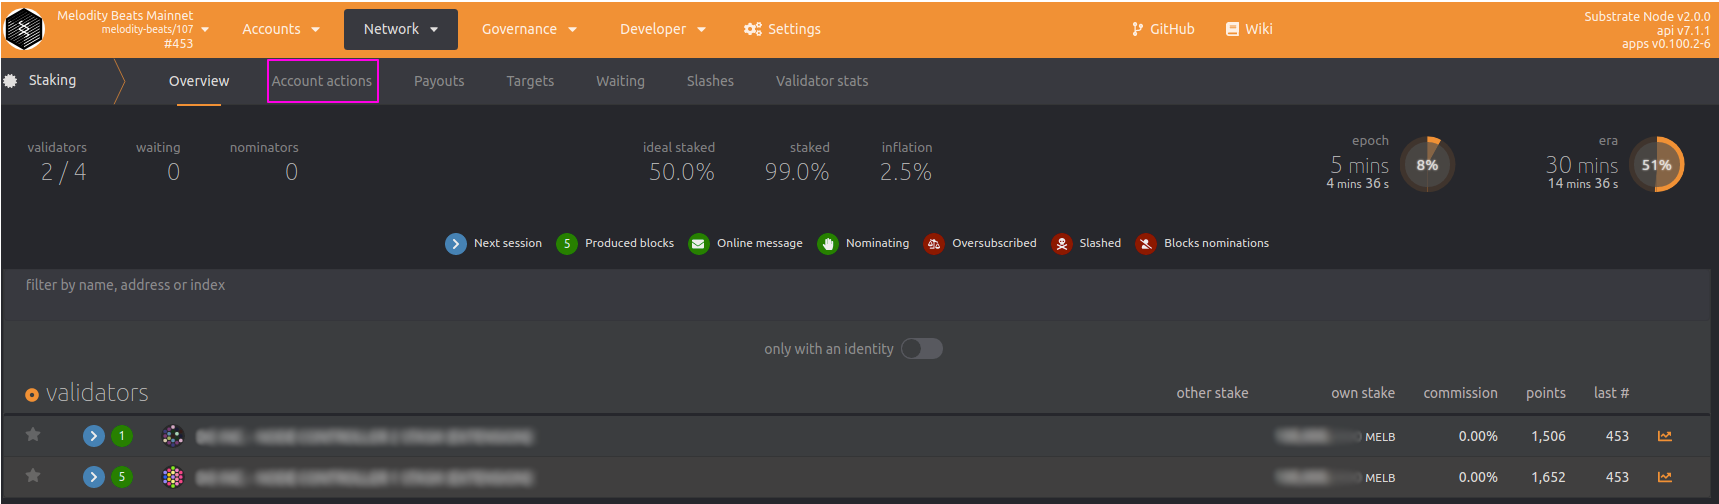
Account actions table
Click the "Validator" button on the right of the page and a popup similar to the following will show up.
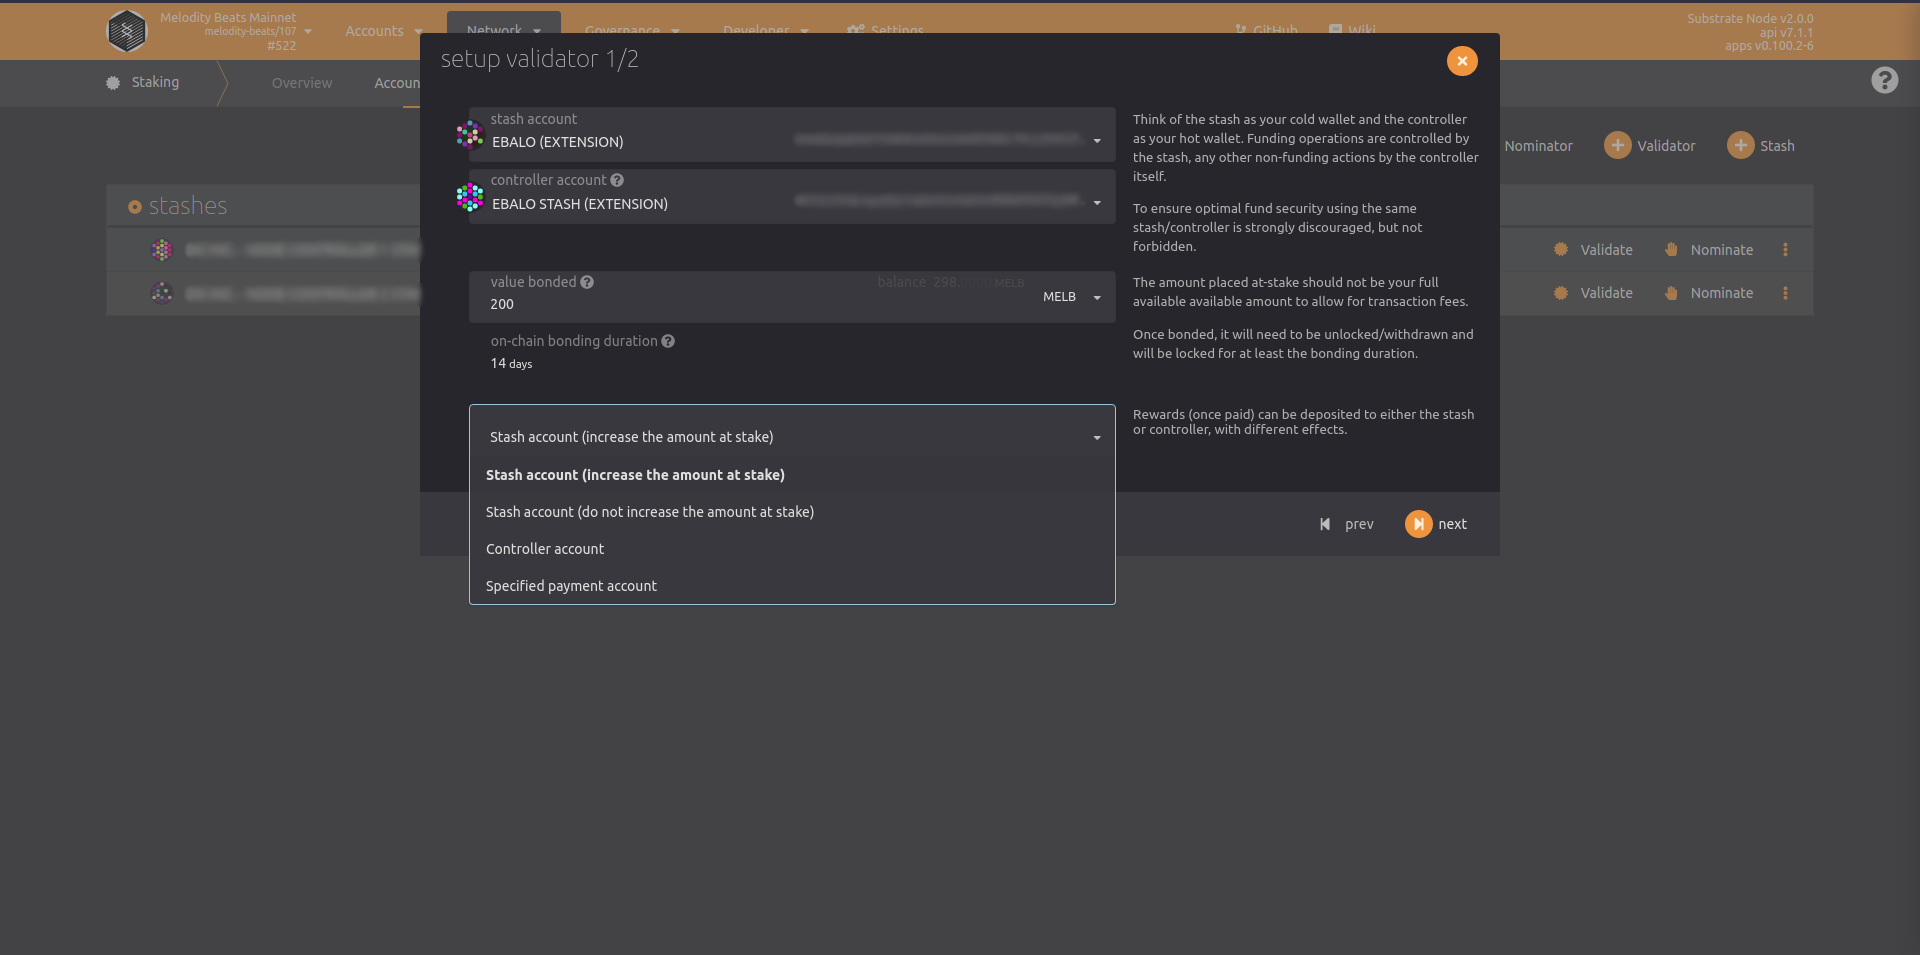
Setting up a validator step 1/2
Select your controller account in the second field and your stash account in the first one. Insert the number of funds to stake in the "Value Bonded" field remember that the controller must own enough funds to pay for transaction fee and to execute any other action on the stash account usually better to leave at least a couple of thousand MELB in the controller for all the procedures and fees.
Based on the way you want to receive the funds choose one of the options from the last dropdown, if you want to receive a higher annual APY you may leave the default option checked.
Press "Next" once ready and you'll be presented with a screen similar to the following.
Setting up a validator step 2/2
Insert in the first field the result of the previous call to
rotateKeys define a reward commission that fits your needs then click the "Bond & Validate" button and sign the transaction.You've now successfully set up your validator node, at the next era rotation (about 1 hour) if a position is available and your node has enough nominators it will be elected and start contributing to the network.
Validator payout
Validator payout may be released by anyone and will be triggered for all the validators, you can check the pending payout and the
Payout table of the Stake section.Payouts will be computed at the end of each era (about 1 hour).
Node operators - Previous
Getting started with nodes
Next - Node operators
Monitor the performances of your node
Last modified 1mo ago